June 15, 2013

Funfetti Cake & How to Assemble a Layer Cake Tutorial


I almost didn't want to write this post. Honestly, I refuse to share this cake. Three days ago, I made a test-run for a Funfetti Cake which seems to be unfamiliar here in Asia. Turned out, it was an epic fail for me! – The cake was too dense (but super-moist) since no mixer involved in the original recipe method. I have to say that when it comes to recipe that needs 100% hand mixing (except for muffins and some chocolate cakes), it won’t work out for me. Yes, that was so disheartening. 

What makes me feel bad is, I wrote down a few options of the Funfetti Cake version to choose from before I move to the kitchen – Some were from my own scratch and some were from the generous blogosphere. I wanted it to be as fluffy and white as it can be so of course it needs egg whites. Unluckily, I rarely chose recipes that call for just egg whites because you know; I didn't want to waste the egg yolks either. Until I opted the wrong recipe (again, I don’t want to share the recipe here). Maybe I should stop being a choosy person?


Ohh, what is this cake is all about you ask? It is just your typical vanilla cake but loaded with colorful rainbow jimmies (or we may know them as rainbow rice here) in the batter. As the name sounds, this cake is so fun! The rainbow jimmies leave their vibrant colors in the cake. It is said to be a famous and delicious box-mix based cake in the childhood among the Westerners. However, the Whipped Vanilla Frosting really saves my fail cake! – For some inexplicable reasons, it tasted like vanilla ice-cream. The best thing is, my sister LOVEs this cake so much (maybe because of its name?) and she ate each slice with spoonful of rainbow jimmies. And yes, we ate the cake straight for two days – that’s how I love cakes (though I love cupcakes even more).


So, back to the topic as written above, I’d love to share a quick tutorial on how to assemble a layer cake for the beginners. Seems that it is going to be a long post, I may not be able to go on a detail to help – Check out the link at the bottom of this post. Yep, I’m not an expert (and I’m still learning), but I wish it helps in some ways! And please excuse those blurry photos (erk!).

How to Assemble a Layer Cake


1. As soon as your cake layers are out from the oven, let them to cool in the pan for about 10 minutes. Then, carefully invert onto the wire-rack. Let them to completely cool.


2. Wrap the cooled cake layers tightly with plastic wraps and freeze for about 30 minutes or refrigerate for an overnight or up to a week. 

 3. Using a long serrated knife, carefully trim the dome-top of each cake layer with a gentle sawing motion (You can use any sharp long knife if you don’t own this specialized knife but I found that it works best.)

4. Place a cake board on the turn-table and spread a small dollop of frosting on top. This will works as “glue” so that your cake stays in place.

5. Place the first cake layer, face-down (means the trimmed side is facing down) and put a dollop of frosting over the center of the cake. To ensure that the frosting are even in each layer, measure the frosting for about 1/4 cup or so (I didn't measure at all this time since my cake was just a 2-layers). 

 6. Using a medium-size offset spatula, spread the frosting evenly.

 7. Optional – if you love sprinkles, do this. If you don’t, skip this step. Sprinkle a generous amount of rainbow jimmies, or any kind of sprinkles on top of the layer.

 8. Place another cake layer, face-up (the trimmed side is facing up) and put another dollop of frosting.
9. Spread a thin layer to cover the entire cake. This process is called as “crumb-coating”. It helps to “seal” the cake crumbs from showing through, before you move on the next beautiful layer. It will make the next process much easier, so DON’T skip this step.

10. Here you have your cake “crumb-coated”. It doesn't have to be neat because we have another step for that. Now, chill the cake for at least 30 minutes or refrigerate for an overnight.

11. After your cake has been chilled, return to the turn-table (your cake should be firm to the touch at this point. When you place your finger on top, the icing shouldn't stick to your finger). Put a big dollop of frosting on top and gently cover with an even layer of the frosting. Continue on the entire sides. (Rinse your spatula with warm water very often as the heat conducted through the spatula helps to make your work easier. This process may be very tricky if you are a first timer but practice does make perfect!)


12. There you have it! Now you have a nice covered-cake. This cake was just out from the fridge after an overnight and you may notice the water drops appeared on top, so I gently worked with a warm-rinsed spatula to smooth it out a bit. 

My cake wasn't perfect and smooth, but I just love it this way :) Finally, decorate with your heart contents!


*Check out this video from Sweetapolita for a more helpful tutorial and the tools you’ll need. I forgot to take photos of the tool that I was using, Opps!

© sweetytoothy. All images & content are copyright protected. Please do not use my images without prior permission. If you want to republish this recipe, please re-write the recipe in your own words, or link back to this post for the recipe .

June 11, 2013

Chocolate Cupcakes with Chocolate Buttercream for Two


Well, I was lazy. More often than not, I’ve found it to be a hassle to drag out the mixer, cream the sugar and butter, sift the dry ingredients and all that fun stuff for a measly two cupcakes. What can I say? I’m lazy. Until then, I found a lot of ‘Cupcakes for Two’ recipes floating around the web (Valentines season it was) and so I decided to make these Chocolate Cupcakes for Two! This was the third times I actually made and devour these guys all by myself but since they were sold too fast, I couldn’t take their photos and share the recipe here.

I came across 52 Kitchen Adventures blog few months ago where she shared her One-Bowl Chocolate Cupcakes for Two and I ran to the kitchen as fast as I could! And this Chocolate Buttercream for Two recipe I share here itself is completely from my own recipe development, and I was so excited with the result! Make these and share it with your sweetie. Aww


What do you need to do?
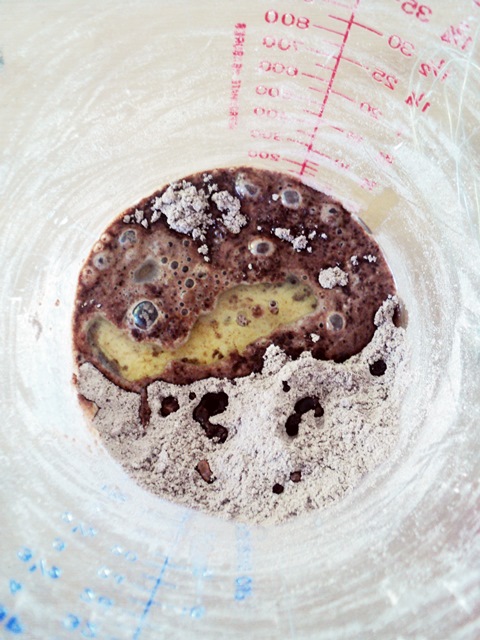
1. Place all dry ingredients in medium bowl (I used a large measuring cup) and whisk until combined.

2. Add wet ingredients to the bowl and whisk until just combined.

3. Divide batter into 2 lined cupcake wells and bake at 350°F for 20-22 minutes.

Umm…no egg? Yepp, no egg! Super easy, right?


I think I was having a blond moment that time,I forgot to take the ‘before’ picture to show you. So if your cupcakes happened to come out with high and cracked tops like a "volcano" which are so not pretty, don’t worry. Here’s the tip: Take a spoon (I prefer the one with a round face) and gently press the top using the back of the spoonDo this at the minutes they are out from the oven.


See, better right? It won’t recover completely but it will take the frosting nicely later on. You could cover the slightly cracked-but-nice-domed top with pretty swirls of yummy chocolate buttercream goodness anyway!

Nevertheless, I have to admit that I always prefer “eggy” cake rather than the eggless one. I’ve tried once before and I really didn’t love the texture at all. The first time I made these cupcakes and took a bite, I was a bit sad that I thought it will change my negative perception towards eggless cakes. But I was wrong. It turned out a bit blunt until I waited for the next day  Just keep in mind that, as for most chocolate cakes, these will turn out better on the next day :)


Although I’m a sweet-toothed gal, I’m recently a bit off with sugary frosting and tend to choose my go-to super-fluffy but not too-sweet cooked frosting (I forgot to share the recipe here, Opps!) for most of my baked goods. But since I know that anything chocolate will make everything just better, I couldn’t resist giving it a go sometimes :) The chocolate buttercream itself is sooo easy to make and rich with chocolate (I did ate a few tablespoons of them before I frost my cupcakes. Mmmm).


Oh my CUPPIES, I wish that I need to forget I ever learned this, or I might be eating cupcakes on a daily basis…
Chocolate Cupcakes with Chocolate Buttercream for Two
Cake recipe adapted from 52 Kitchen Adventures, Buttercream recipe from Sweety Toothy original.
Ingredients
for the cupcakes:
3 tablespoons all-purpose flour
2 tablespoons sugar
1 tablespoon natural unsweetened cocoa powder (not Dutch-processed) *see notes below
1/8 teaspoon + 1/16 teaspoon baking soda
1/16 teaspoon salt
1/16 teaspoon instant coffee powder (optional, but recommended)
3 tablespoon milk
1 tablespoon canola oil
1/2 teaspoon pure vanilla extract

for the buttercream:
2 tablespoons unsalted butter or margarine, at room temperature
3 tablespoons cocoa powder
1/4 cup powdered sugar
1/4 teaspoon vanilla extract
1/2-1 teaspoon milk
Method
for the cupcakes:
1. Preheat oven to 350°F and line a cupcake pan with 2 paper liners.
2. In a medium bowl, whisk the flour, sugar, cocoa powder, baking soda, salt, and instant coffee together.
3. Add milk, oil, and vanilla and whisk until just combined.
4. Evenly divide the batter into the 2 lined cupcake wells (mine were almost 3/4 full).
5. Bake for 20-22 minutes, or until a toothpick inserted in the center comes out clean. Set aside to cool.

for the buttercream:

1. Beat butter for few minutes until smooth.

2. Add cocoa powder and powdered sugar and mix until combined.

3. Add vanilla and 1/2 teaspoon of milk, then mix until incorporated. Add additional milk if necessary to achieve desired consistency. Spread or pipe onto cooled cupcakes.

Notes:
  •  * If you don’t have unsweetened natural cocoa, and only Dutch process (cocoa that’s been treated with an alkalizing agent to neutralize the natural acidity of cocoa powder), you can make an adjustment and use it, but don’t straight out substitute it. You can add 1/8 teaspoon of cream of tartar, or 1/8 teaspoon lemon juice or vinegar, for every 3 tablespoons (18 grams) of Dutch process in the recipe to balance it out (thanks Joy of Baking for that tip!)
  • 1/16 teaspoon is about the same as a pinch.
  • Instead of using a bowl, I mixed all the ingredients in a large measuring cup with a pouring spout. This way, it is much easier to fill the cupcake liners (with a help of a spoon) without making a mess.
  • If you don't want a lot of frosting, try reducing the recipe in half (the frosting is enough for about four cupcakes). Pipe them high or snack on the leftover!
  • Stay tune for more variety of ‘Cupcakes for Two’ recipes!


© sweetytoothy. All images & content are copyright protected. Please do not use my images without prior permission. If you want to republish this recipe, please re-write the recipe in your own words, or link back to this post for the recipe .

May 16, 2013

pink rose vanilla cupcakes in doilies wrappers

Happy Sunday! I decided on a whim a couple of weeks ago (yes, it takes me that long to go from food to post), that I’d bake something for myself after a quite long time. If you are really close with me, or read all through my previous post, or really want to know something about me; I’m so much devoted to pink like most of any other girls – from pajamas, tops, blankets, bags, hair combs, shampoos and to drinks and food, they have to be in pinks. Truthfully I am not that pink-crazy, but that just happened unconsciously (if you know what i mean).


I was actually making these as a reward for myself, through all those courage, scary accidents, tears, lack of sleeps along with efforts since last month (which that I can’t really believe that I could be a baker in real life :)).True, being a baker (home-baker to be precise) had never even crossed my mind, as well as a business person. I thought it is such a complicated job and thing to do. Why would you choose to do your own business when you have lot of jobs out there and get paid?  And you’re done — such an immature thinking, right? Never mind, I don’t want to create an issue if I have to say that building your own business is better than. . tett tettt!

The thing is, I still want to share my favorite cupcake recipe although it is just almost the same as the previous one.  White /vanilla cake batter tinted with pink color and topped with pink frosting – Pretty! One (or more things) that I had changed was, adding yogurt and less eggs in the batter, with no buttermilk and they came out so moist and delicate. I did learn something from that – using the real yogurt/sour cream leads to a truly moist and decadent cake rather than faking them. Trust me, it makes the difference!


I've got extra frosting lying around I want to use up, so I just went with it to top my pretty in pink cupcakes. So then I took out some from the fridge, sat down and practiced to make rose swirls...not bad huh? I have to say, that were my first rose swirls ever! Why wouldn't I be so happy? Pink? Rose? Vanilla cupcakes? I would cry for them! I've actually been wanting to make these for a long time ago but I was waiting to get my hands on Wilton 1M rose star tip (or any brands or even unbranded ones) for the perfect roses on my cakes. I've been dreaming of them, really, but I couldn't find them at the baking isle around here. I've even went to the baking suppliers stores out of my home-country, Yummie Bakery Bangi, Bagus BS Shah Alam, you name it, which are so well-known but they were told to be out of stock and since the tips are imported, it’s hard to have them back in stock in a short time – my baddd. I know, I know this tip I have on hand is also known as a rose tip (the supplier said), but still, I want the real one badly.


I was not generous with my cupcakes this time, and I didn't even want to share with my sister or any other cake-eaters seriously, but, almost.  It’s not like I used to be a stingy person, but just because they were too pretty to be eaten and I didn't have the heart to eat them.


Even for the photography . . . I just didn't want to bite the rose ones, but luckily I had this one on purpose.


But then I had to force myself to eat her in the end, before anyone else did. Bite with tears.


I got a bit pink-happy with these (maybe because I didn't realize the frosting is already in dark pink) and next time I would use less for a softer pink, as I did in this cupcake version. You can just leave the cupcakes natural or play around with any colors you want, of course. Have fun!

Pink Rose Vanilla Cupcakes
yield 24 cupcakes

ingredients:

1 box white/vanilla cake mix or follow the instructions here to make the substitute.
2 eggs
1 cup yogurt (flavored or unflavored) or sour cream*
1 cup milk
1/3 cup vegetable oil
1 tsp. desired food coloring, optional.

method:

Preheat oven to 180 C. Line two 12-holes cupcake pans with 24 cupcake liners. Set aside.

Combine all ingredients until incorporated (about 30 seconds). Scrapes sides of bowl and then
beat on medium-high speed for 20 minutes. Add food coloring and beat for few seconds.

Fill in the cupcake liners until 2/3 full and bake for 15-18 minutes or until an inserted toothpick comes out clean.

Let to cool completely and frost with any frosting of your choice**.

Notes:

  • *I used Dutch Lady low-fat plain yogurt.  1 small container serves ½ cup, so you will need 2.
  • **If you are still clueless what frosting you would want to top your cupcakes, or even haven’t found your favorite one, I’d highly recommend this one. It’s my favorite so far and wins over Swiss Meringue Buttercream (SMB) — personally!
  •  This recipe can be simply cut into ½ or ¼.
  •  You can also use this batter to make fabulous color burst/rainbow cupcakes like this one.
  •  For a whiter cake batter (to lighten up the color you've added in), you could substitute the whole eggs to just egg whites, but I’m not certain with the exact egg whites amounts you'll be needing.
  •  Good news for those who have pretty cupcakes obsession — I’ll be posting a tutorial on how to make these DIY doilies cupcake wrappers soon!
© sweetytoothy. All images & content are copyright protected. Please do not use my images without prior permission. If you want to republish this recipe, please re-write the recipe in your own words, or link back to this post for the recipe .